Deploying Hugo Sites on Cloudflare Pages with Decap CMS and GitHub Backend
- Abhishek Tiwari
- Hacking
- 10.59350/dp6cx-sma35
- Crossref
- December 3, 2024
Table of Contents
Recently I migrated this website from Ghost to Hugo. This site is now generated by Hugo, stored by Github, deployed on Cloudflare Pages, and content managed via Decap CMS. Hugo, Decap CMS, Cloudflare Pages, and GitHub together create a powerful and efficient stack for building, managing, and deploying static websites. This combination is perfect for anyone seeking to develop a scalable and flexible publishing workflow, as well as content creators looking for an easy-to-use content management interface.
New Stack
Hugo is one of the fastest static site generators available, capable of transforming markdown files into fully functional websites in seconds.
GitHub acts as the backend for this workflow, serving as the repository for my Hugo site and powering Decap CMS’s Git-based content management.
Decap CMS (formerly Netlify CMS) is an open-source, Git-based content management system. With its intuitive admin interface, Decap CMS enables non-technical users to manage website content directly from a browser.
Cloudflare Pages offers globally distributed platform for deploying static sites. It provides automatic builds, branch-based previews, and a robust CDN for blazing-fast delivery.
Step-by-Step Guide
In this guide, you’ll learn how to set up and deploy a Hugo site on Cloudflare Pages with Decap CMS and GitHub as the backend. This setup is inspired by Decap CMS for Cloudflare Pages but covers more advanced topics like branch-specific base URLs, Github authentication for Decap CMS, pull request preview URL integration, Cloudflare Access protection for preview URLS to streamline collaboration and deployment. Let’s dive in!
Configure Cloudflare Pages for Hugo
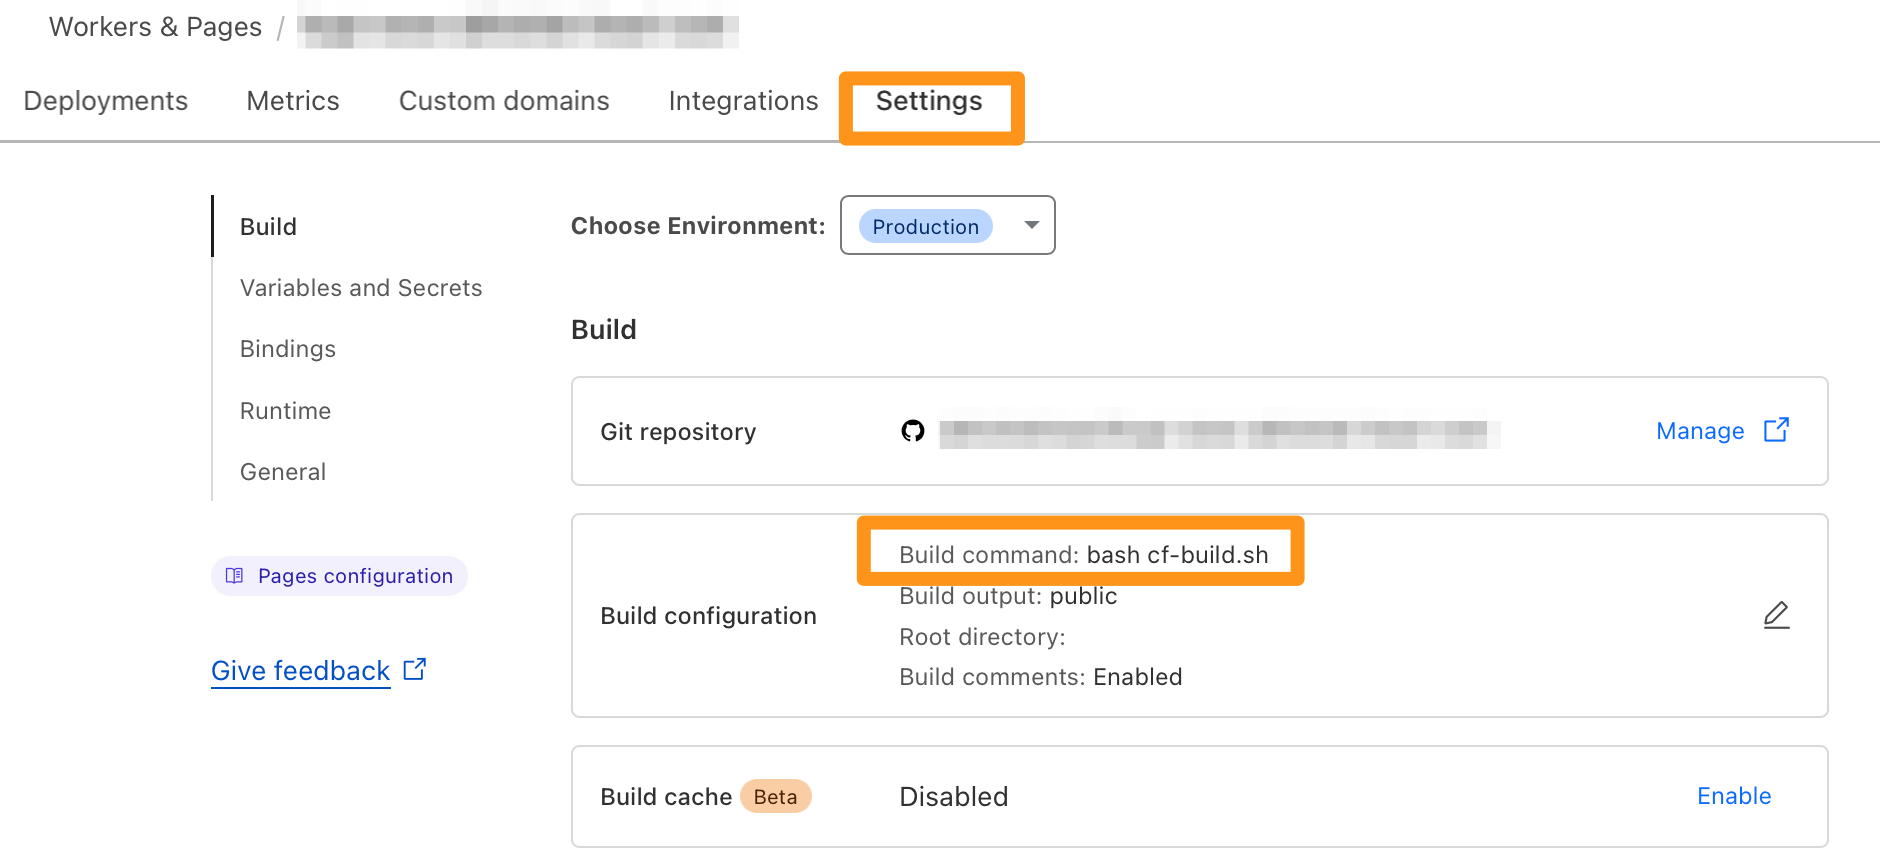
Start by connecting your Hugo project’s GitHub repository to Cloudflare Pages. Once connected, configure the build settings in the Cloudflare Pages admin UI.

To handle different base URLs for production and preview builds, create a cf-build.sh file at the root of your Hugo project and add following code. Note we are using unshallow and enableGitInfo so we can use Git to determine the update dates. My Hugo theme setup relies on certain npm modules but this may not be relevant for you, so feel free to adjust the build file.
#!/bin/bash
if [ "$CF_PAGES_BRANCH" == "main" ]; then
  git fetch --unshallow && npm install && hugo -b $BASE_URL --gc --minify --templateMetrics --templateMetricsHints --forceSyncStatic --enableGitInfo
else
  git fetch --unshallow && npm install && hugo -b $CF_PAGES_URL --gc --minify --templateMetrics --templateMetricsHints --forceSyncStatic --enableGitInfo
fi
Register this cf-build.sh file as the build command in the Cloudflare Pages admin UI or in your wrangler.toml file if you’re using Wrangler for deployment.
[build]
command = "bash cf-build.sh"
Additionally, set up BASE_URL environment variables in the Cloudflare Pages admin UI. BASE_URLis your production domain (e.g., https://www.yourdomain.com). For preview build, script usage CF_PAGES_URL automatically set by Cloudflare Pages for branch-specific preview URLs.
Set Up Decap CMS for Cloudflare Pages
To set up Decap CMS with GitHub OAuth authentication, follow these steps:
Create a GitHub OAuth Application
Go to your GitHub account’s developer settings and create a new OAuth application, and note the Client ID and Client Secret. To create application provide the Authorization call back URL Authorization callback URL https://www.yourdomain.com/api/callback
Add GitHub Credentials to Cloudflare Pages
Add GITHUB_CLIENT_ID and GITHUB_CLIENT_SECRET as secrets in the Cloudflare Pages project setting. These should match the Client ID and Client Secret from your GitHub OAuth application.
Add Functions for Authentication
Download the Decap CMS for Cloudflare Pages repository and copy the functions directory from the repository to the root of your Hugo project. These functions handle GitHub OAuth authentication for Decap CMS.
Set Up Decap CMS Admin Interface
In your Hugo project’s static directory, create an admin folder add following content to index.html file. This file does a few things. It loads decap-cms.js and other modules then registers PostPreview and PreviewStyle. In my case, I use Katex math in my articles so I am loading remark-math, rehype-mathjax to preview those. Depending on your use case you may or may not require all of these modules.
<!DOCTYPE html>
<html>
  <head>
    <meta charset="utf-8" />
    <meta name="viewport" content="width=device-width, initial-scale=1.0" />
    <title>Content Manager</title>
  </head>
  <body>
    <!-- Include the script that builds the page and powers Netlify CMS -->
    <script src="https://unpkg.com/decap-cms@3.4.0/dist/decap-cms.js"></script>
    <script type="module">
      import Markdown from 'https://esm.sh/react-markdown@9?bundle'
      import remarkMath from 'https://esm.sh/remark-math@6.0.0?bundle'
      import rehypeMathjax from 'https://esm.sh/rehype-mathjax@5.0.0?bundle'

      import remarkGfm from 'https://esm.sh/remark-gfm@4.0.0?bundle'
      import rehypeRaw from 'https://esm.sh/rehype-raw@7.0.0?bundle'

      var PostPreview = createClass({
        render: function() {
          if (this.props.widgetFor('body') != null) {
            return Markdown({
              children: this.props.widgetFor('body').props.value,
              rehypePlugins: [rehypeMathjax, rehypeRaw],
              remarkPlugins: [remarkMath, remarkGfm]
            });
          } else {
            return '';
          }
        }
      });
      CMS.registerPreviewTemplate("articles", PostPreview);
      CMS.registerPreviewStyle("/admin/preview.css");
    </script>
  </body>
</html>
In admin folder add preview.css file - registered for preview style in above snippet - to add your preview styling. Here is my version,
/* Import Google Fonts */
@import url('https://fonts.googleapis.com/css2?family=PT+Sans:wght@400;700&family=Poppins:wght@400;700&display=swap');

/* General Body Styling */
body {
    font-family: 'Poppins', sans-serif;
    line-height: 1.6;
    margin: 0;
    padding: 0;
    background-color: #f9f9f9;
    color: #333;
}

/* Headline Styling */
h1, h2, h3, h4, h5, h6 {
    font-family: 'PT Sans', sans-serif;
    font-weight: 700;
    color: #222;
    margin-top: 1.5rem;
    margin-bottom: 0.75rem;
}
/* Redacted for simplicity */
Configure Decap CMS Backend and Collections
Add a config.yml file in the admin directory to configure Decap CMS. Here’s an example config.yml for a blog which uses Github as backend, enables editorial workflow, preview links, editor previews.
site_url: https://www.yourdomain.com
display_url: https://www.yourdomain.com
publish_mode: editorial_workflow
show_preview_links: true
backend:
  name: github
  repo: user/repository
  branch: main
  base_url: https://www.yourdomain.com
  auth_endpoint: /api/auth
  squash_merges: true
  preview_context: 'cloudflare preview deploy'
media_folder: "static/uploads"
public_folder: "/uploads"
collections:
  - name: articles
    label: Articles
    folder: "content/articles"
    create: true
    slug: "{{slug}}"
    preview_path: '{{slug}}'
    editor:
      preview: true
    fields:
      - { name: "title", label: "Title", widget: "string" }
      - { name: "body", label: "Body", widget: "markdown" }
Set-up Pull Request Status Updates
To integrate Cloudflare Pages preview URLs with GitHub pull requests, we will use a custom GitHub Action. This GitHub Action converts Cloudflare pull request check to status which is required for Decap CMS preview link. Create a Github workflow file named cloudflare-preview-status.yml in .github/workflows of your Hugo project and add following:
name: Convert Cloudflare Check Run to Status
on:
  check_run:
    types: [completed]

jobs:
  create_status_for_check:
    name: Create Status for Check Run
    runs-on: ubuntu-latest
    permissions:
      checks: read
      statuses: write
    steps:
      - uses: actions/github-script@v7
        with:
          script: |
            const getPreviewUrlForCheck = (check) => {
              console.log(check)
              const regex = /<strong>Preview URL:<\/strong><\/td><td>\n<a href='(.*?)'>/s;
              const match = check?.output?.summary?.match(regex);
              console.log(match)
              return match?.[1];
            };

            const getCloudflareCheckForRef = async (owner, repo, ref) => {
              const {
                data: { check_runs: checks },
              } = await github.rest.checks.listForRef({ owner, repo, ref });

              return checks.find((check) => check.app.slug === "cloudflare-workers-and-pages");
            };

            const createDeployStatus = async (owner, repo, sha, target_url) => {
              await github.rest.repos.createCommitStatus({
                owner,
                repo,
                sha,
                target_url,
                state: "success",
                context: "cloudflare preview deploy",
                description: "Cloudflare preview deploy successful",
              });
            };

            const main = async () => {
              const [owner, repo] = "${{ github.repository }}".split("/");
              const ref = "${{ github.event.check_run.check_suite.head_sha }}";
              const check = await getCloudflareCheckForRef(owner, repo, ref);
              const previewUrl = getPreviewUrlForCheck(check);

              if (!previewUrl) {
                console.log("No preview URL found in check run output")
                return;
              }
              await createDeployStatus(owner, repo, ref, previewUrl);
              console.log("Created status for Cloudflare preview deploy");
            };

            await main();
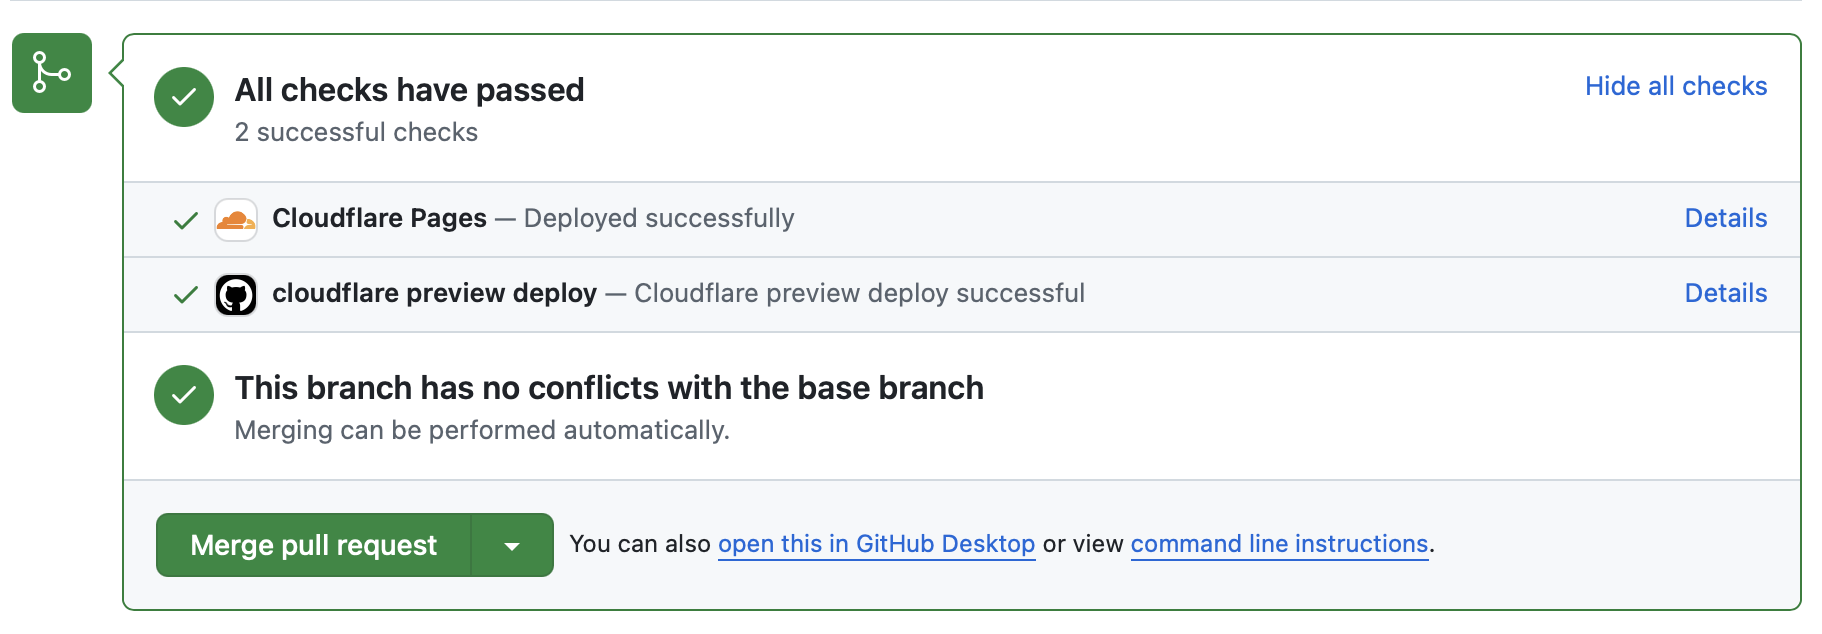
If above action works, then pull request created by Decap CMS in your Hugo project Github repository will display Cloudflare Pages check suggesting changes are deployed successfully and a new status titled cloudflare preview deploy will be displayed.

Verify the Overall Setup
Push your Hugo project changes to GitHub to trigger a Cloudflare Pages build and verify the overall setup by confirming,
- Cloudflare Pages is building both preview (for draft entries using editorial workflow) and production (for published entries) sites with the correct base URLs.
- Decap CMS is accessible at
https://www.yourdomain.com/adminand works with GitHub OAuth authentication. - Pull request for draft change created by Decap CMS on GitHub is displaying a link to the Cloudflare Pages preview in the status section. Once you published a draft change, pull requests is merged by Decap CMS to
mainbranch to build Production site. - Finally you will see a preview link when editing the collections registered in your Decap configuration. Decap CMS Preview link will show with a lag of upto 5 minutes.

Protect Previews and Decap CMS by Cloudflare Access
When deploying a site on Cloudflare Pages, it’s essential to protect sensitive preview URLs from public access and Google crawlers. By enabling Cloudflare Access, you can secure these preview URLs and ensure that only authorized users can access them. In addition, you can also add additional protection for Decap CMS Admin by putting it behind the Cloudflare Access.
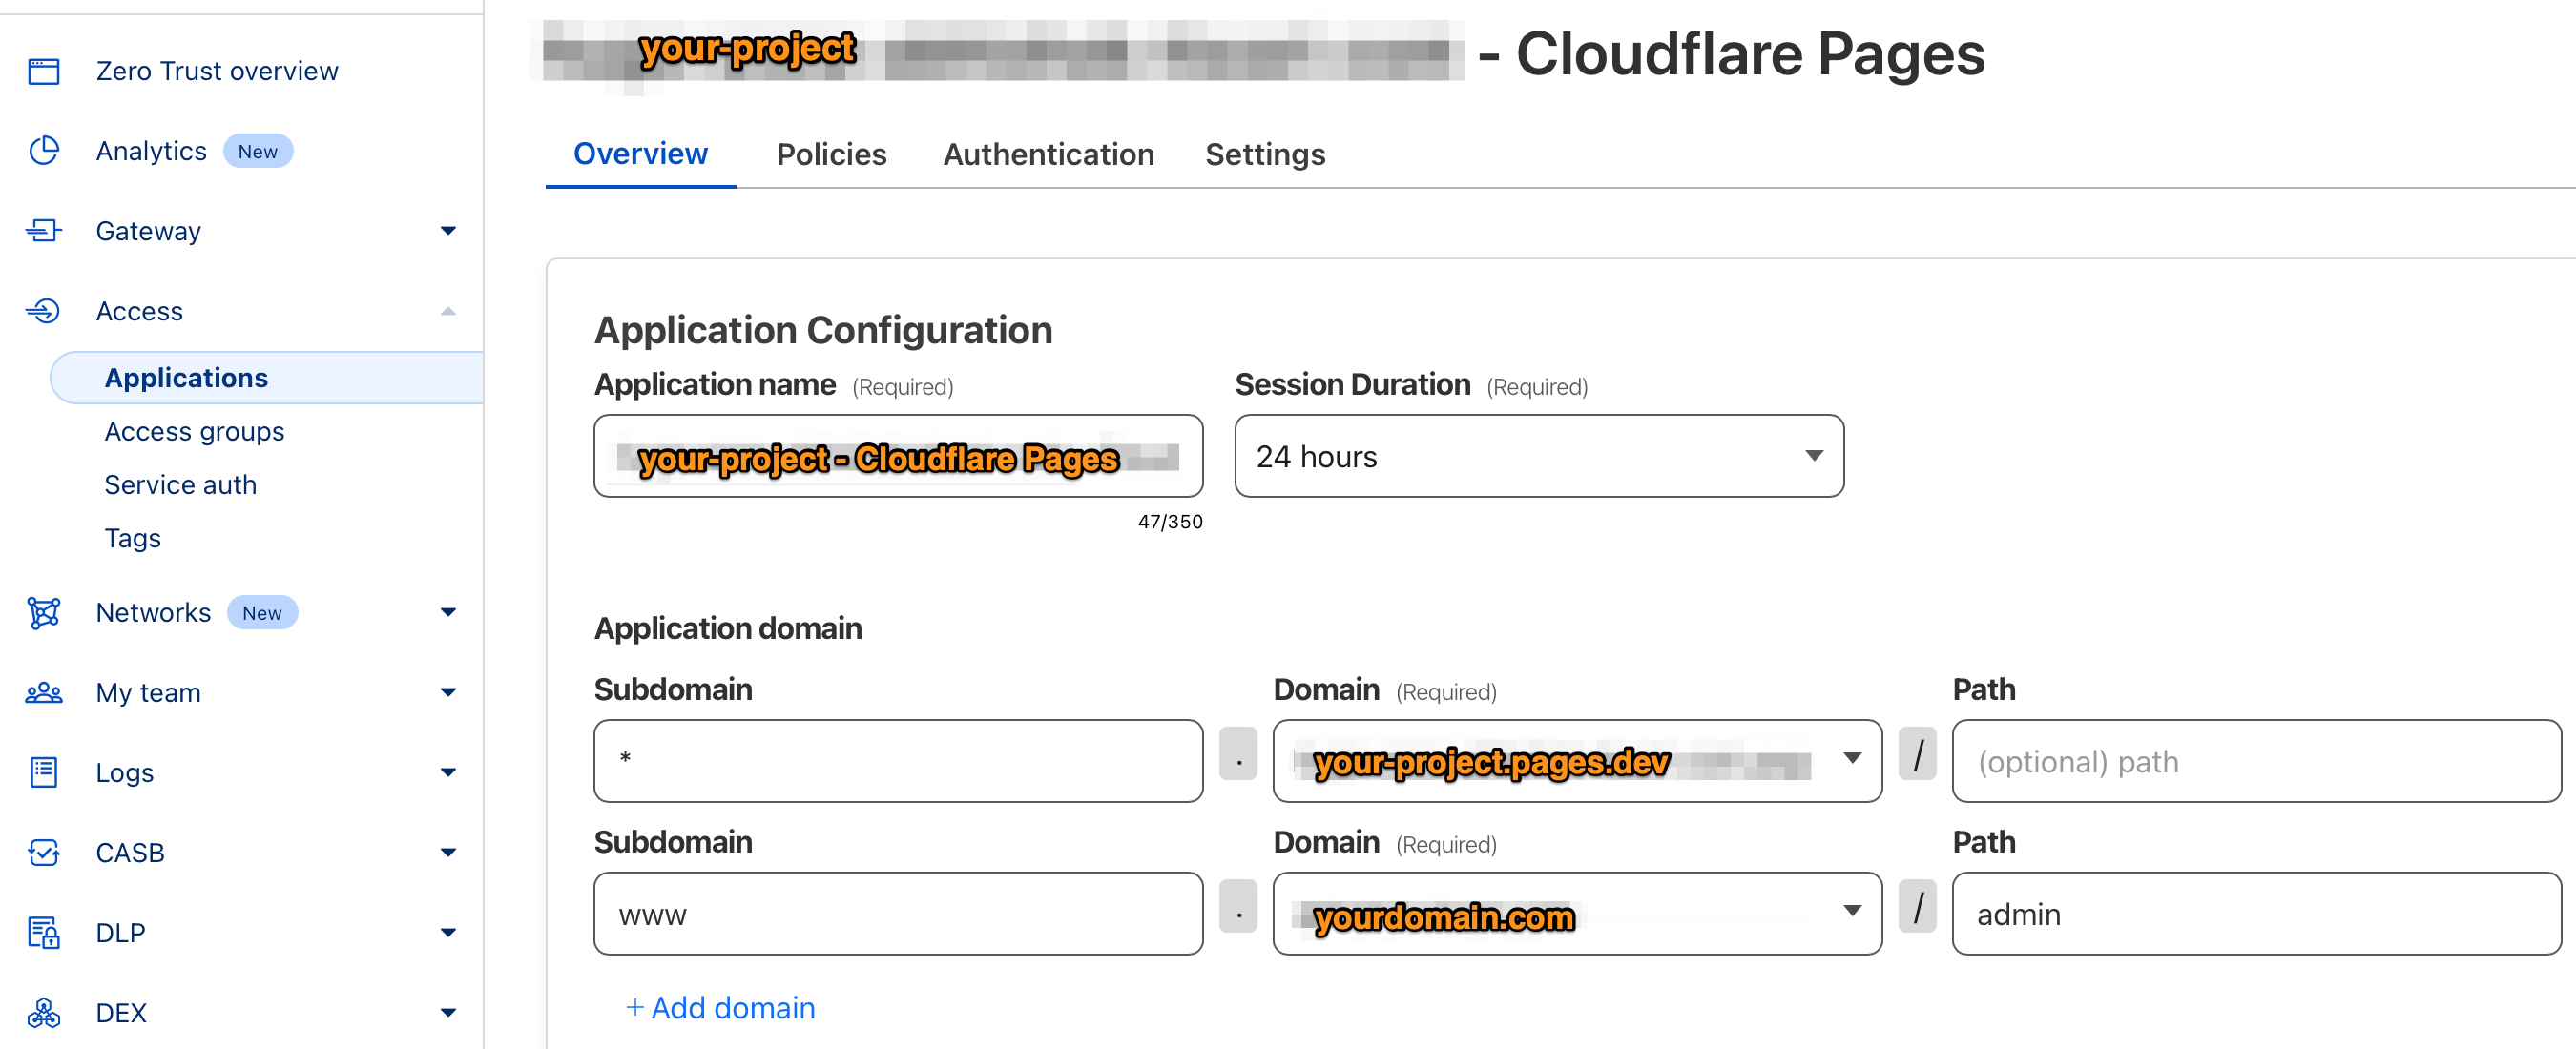
To enable Cloudflare Access, go to your Cloudflare Pages project then settings and enable the Access policy. By default it will only protect your preview deployment URLs (for example, 373f31e2.your-project.pages.dev where 373f31e2 is commit hash). To protect /admin URL or custom domain specific to a branch like staging.yourdomain.com, update the policy to add your custom domain.

Last but not least you should redirect your Cloudflare Pages project domain i.e. your-project.pages.dev to your custom domain to prevent crawlers from indexing and impacting your SEO. Use Cloudflare Bulk Redirects to redirect your-project.pages.dev to your custom domain www.yourdomain.com. Do not add your-project.pages.dev behind Cloudflare Access otherwise your custom domain will be not accessible publicly.
Closing remarks
Let me know how you go with these instructions and if there are any feedbacks or improvements you would like to add.


