Getting started with Conduit - lightweight service mesh for Kubernetes
- Abhishek Tiwari
- Hacking
- 10.59350/4t9wy-5c763
- Crossref
- December 25, 2017
Table of Contents
On this blog from very early on, we have advocated the concept of service mesh. In fact, our post a sidecar for your service mesh is one of the most viewed posts this year. When Buoyant announced the Conduit - their next-generation lightweight service mesh for Kubernetes - we were really thrilled. Buoyant is also the creator of Linkerd which is one of the most widely used service mesh currently available to the microservices community. Linkerd can already run on Kubernetes, Mesos, cluster of hosts.
Why Conduit
First for all Kubernetes is certainly winning the container orchestration war. Now focus is shifting towards service mesh and how to make Kubernetes more productive for organizations trying to build a large number of microservices using autonomous teams who own and operate their own microservices. For Kubernetes, Istio - currently supported by IBM, Google and Lyft - has emerged as go to service mesh platform. Istio is being developed aggressively and it is evolving quite fast (current version is 0.4). Both Istio and Linkerd are bit heavyweights and initial focus seems to be on large engineering teams. That’s where Conduit fits really well. Conduit is very lightweight when compared to Istio and Linkerd. Conduit features a native proxy written in Rust which makes it blazingly fast.
Conduit Architecture
When you first install Conduit on a Kubernetes cluster it creates a control plane. When you add a microservice to Conduit service mesh it creates a data plane proxy which is deployed as sidecar container alongside your microservice code. To be more accurate, to add a microservice to Conduit, you have to inject the data plane sidecar by modifying the Kubernetes config file for your service just before deployment. The data plane is managed by control plane and control plane provides APIs to for modifying its behavior. To interact with control plane you can either use Dashboard UI or the Conduit command line interface (CLI) - both utilize the control plane APIs.
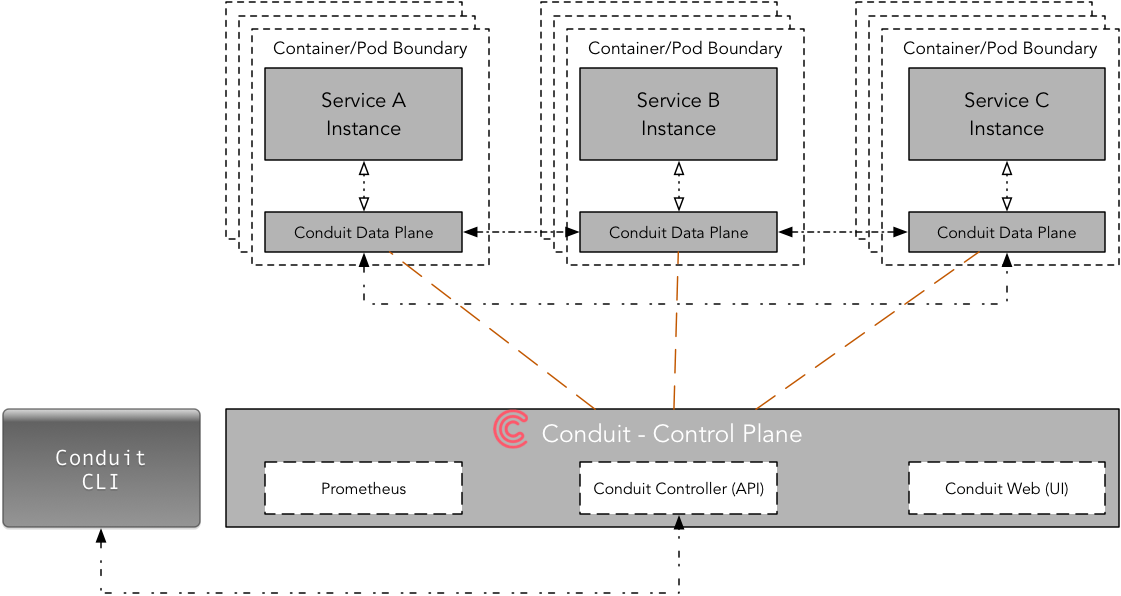
Conduit’s core connection with Kubernetes is the Deployment, not the Service. Conduit is using Deployment primitive to inject a sidecar container (data plane) into individual pods. Due to the one-to-one relationship between a pod and a deployment, the mapping between traffic flows and pod a lot easier to manage.
Let’s get started
Prerequisite
I assume you have already installed the Docker, Minikube, and Kubectl. If not please follow this step-by-step guide on how to setup Minikube as a local development environment for kubernetes. For this tutorial you need minikube v0.24.1 or higher, kubectl v1.8.4 or higher, and Kubernetes v1.8.0 or higher.
First, start the minikube with Kubernetes v1.8.0
minikube start --kubernetes-version v1.8.0
Next, run following command to validate if kubectl can connect minikube; it should print versions for your kubectl and Kubernetes cluster.
kubectl version --short
Install Conduit CLI
Conduit CLI is designed to work in conjunction with kubectl whenever possible. Now, let’s install the Conduit CLI and then add it to your path.
curl https://run.conduit.io/install | sh
export PATH=$PATH:$HOME/.conduit/bin
To add Conduit CLI, to your path permanently you can also edit your ~/.bashrc to add path and reload it. For .zshrc, I added following line.
export PATH="$HOME/.conduit/bin:$PATH"
To check if everything is in place now run following command which should print client and server version. Initially, server version will be unavailable as we have not created the control plane yet.
conduit version
Let look at various Conduit CLI commands.
conduit --help
For now, we are going to focus on three key commands,
conduit dashboardwhich opens the Conduit dashboard in a web browserconduit injectwhich adds the Conduit proxy to a Kubernetes configconduit installwhich outputs Kubernetes configs to install Conduit
Conduit CLI provides a flag -n namespace for namespace in which Conduit is installed (default “conduit”).
Both conduit install and conduit inject generate Kubernetes configurations which are piped into the kubectl for orchestration. More importantly, you don’t need to change your app or microservice to use the Conduit service mesh. For example, conduit inject can be used on an existing live Deployment, as Kubernetes rolls pods to include the data plane proxy as it updates the Deployment.
As you can see, Conduit provides a clear separation between service mesh, application code, and orchestrator.
Install Conduit Control Plane
Now we are going to install Conduit control plane on your local Kubernetes cluster which is running inside minikube. This will create few Kubernetese services and deployments required for Conduit control plane to operate.
Running below command generates a Kubernetes config file, and then pipes it to kubectl.
conduit install | kubectl apply -f -
If you don’t want default “conduit” namespace you can pass your own namespace using -n flag (assumes namespace already exists).
conduit install -n my-namespace | kubectl apply -f -
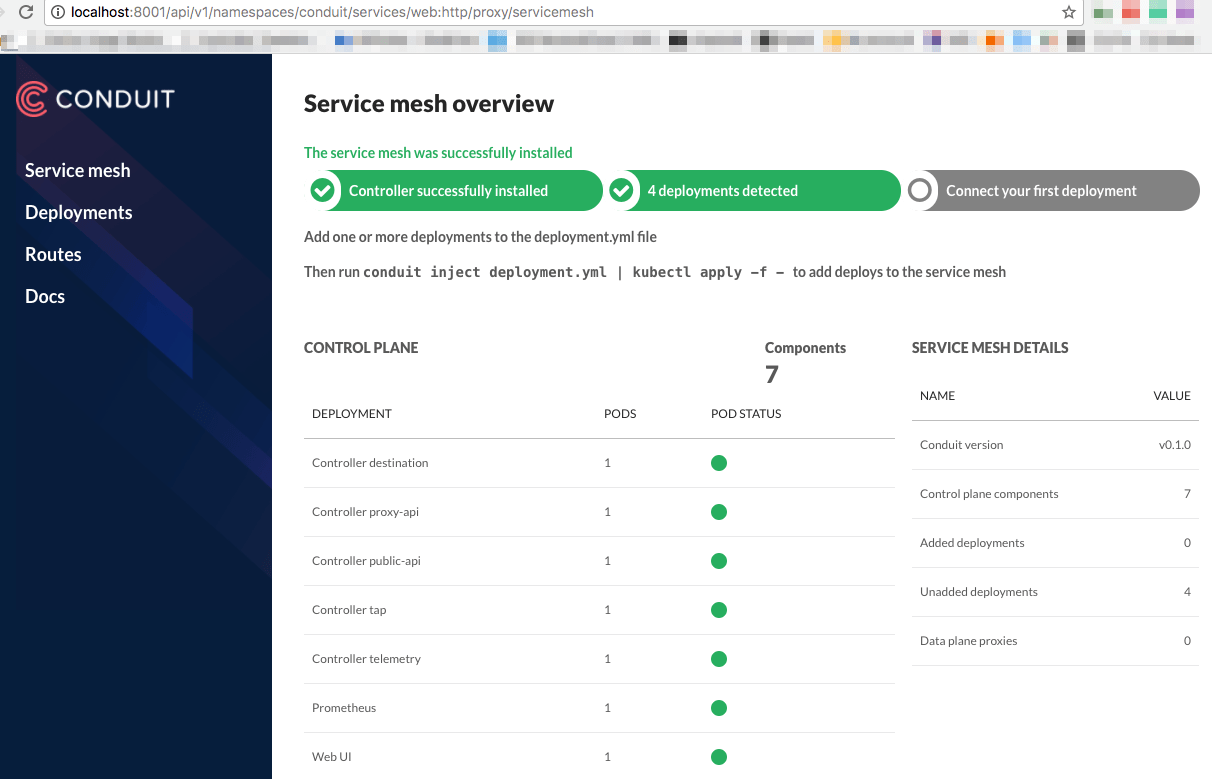
At this point, control plane should be up and running. We can validate this by opening Conduit dashboard,
conduit dashboard
To access the dashboard on minikube you have to browse one of following URLs,
- 127.0.0.1:8001/api/v1/namespaces/conduit/services/web:http/proxy/routes or,
- localhost:8001/api/v1/namespaces/conduit/services/web:http/proxy/routes
Create Conduit Data Plane
To create data plane you need an app or a microservice with the Kubernetese config file. Obviously, this Kubernetes config file (let’s call it app-config.yml) can include of one or more deployments/services specifications.
conduit inject app-config.yml | kubectl apply -f
emojivoto
Let start with example app emojivoto maintained by Conduit team.
The app is composed of the following 3 services:
- emojivoto-web: Web frontend and REST API
- emojivoto-emoji-svc: gRPC API for finding and listing emoji
- emojivoto-voting-svc: gRPC API for voting and leaderboard
First, we are going to clone the repository.
git clone https://github.com/runconduit/conduit-examples.git
cd conduit-examples/emojivoto
Second, we will create data plane for this emojivoto app,
conduit inject emojivoto.yml --skip-inbound-ports=80 | kubectl apply -f -
This will deploy our emojivoto app with data plane as a sidecar. As of the now, the Conduit sidecar only supports HTTP/2 (including gRPC) hence --skip-inbound-ports flag was used here to bypass the proxy for any HTTP request.
You can view this app in a browser by visiting the public IP of the service. To find public IP on minikube simply run following command,
minikube -n emojivoto service web-svc --url
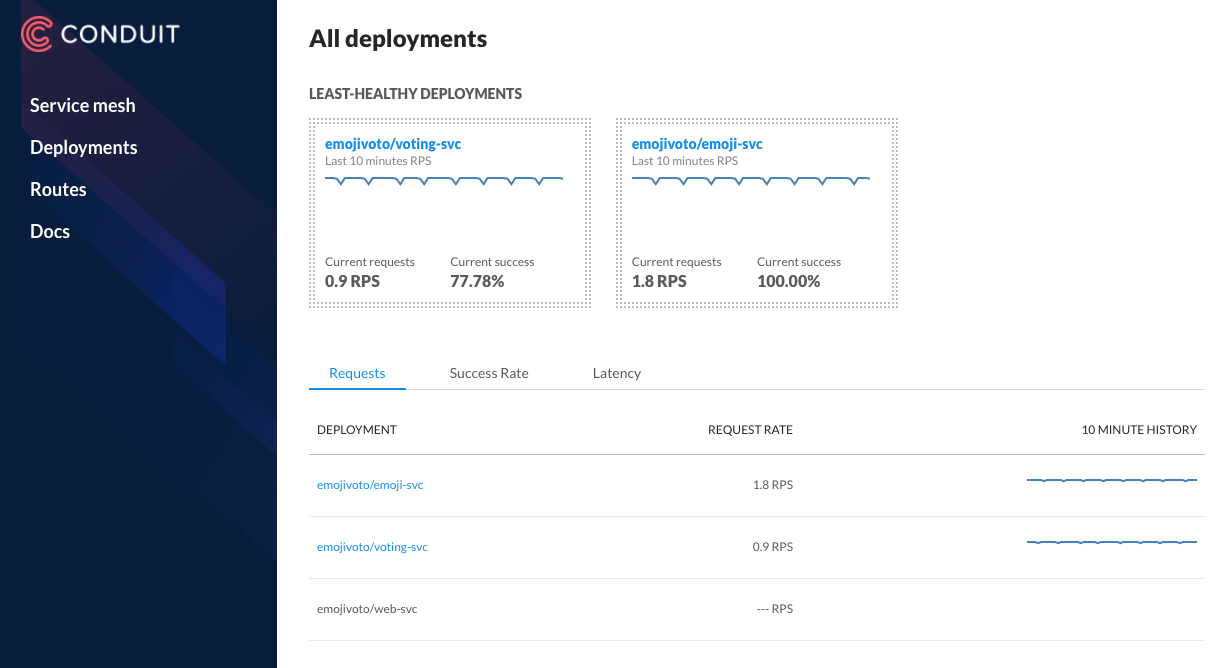
Conduit Dashboard provides a detailed telemetry of deployments (those with data plane proxy) including requests per second, success rate, latency (in percentile), etc. It also brings the telemetry about upstream and downstream deployments.
Another way to inspect the health of your deployments is using CLI commands conduit stat and conduit tap.
You can display runtime statistics about mesh resources (pod or deployment) using conduit stat.
conduit stat deployments
conduit stat deployment emojivoto/emoji-svc
Similarly, conduit tap enables you to listen to a traffic stream (pod or deployment).
conduit tap deployment emojivoto/emoji-svc
First impression
From the perspective of a developer’s workflow, it was a lot easier to setup and running Conduit when compared to its counterpart Istio and Linkerd. As of now, it lacks some of the key service mesh features such as inter-service authentication which is on the roadmap.