
If you are working with an e-commerce website, 5 to 10 e-commerce conversion pixels are quite common these days. Ad conversion pixels, affiliate conversion pixels, web analytics conversion pixels are most common type of tags typically deployed on an e-commerce website. Most of conversion pixels are designed to collect the transaction data such as id, total revenue, tax, products etc. Depending on pixel type, data collected by conversion pixel serves different purpose. For instance, ad conversion pixels allows you to calculate cost per acquisition (CPA), whereas affiliate conversion pixels enables affiliate or third-party partners to track sales contributed by their network. Normally conversion pixel requests are triggered on the confirmation or success page once customer has completed the transaction.
With growing number of conversion pixels, it is quite important that a proper conversion tracking implementation is in place so you can avoid duplication and delay in pixel implementation while keeping implementation cost lower. This post highlight how using Google Tag Manager (GTM) with data layer smartly can make conversion tracking more maintainable and extensible.
Google Tag Manager & Data Layer
GTM along with data layer allows you to implement new conversion pixels without requiring any change from your IT or development team.
Prerequisite:
- GTM is deployed on all pages or at least on the transaction confirmation/success page.
- Data layer transaction object is placed on confirmation/success page.
Please see full description of GTM data layer transaction object here. Alternatively, you can implement the GTM data layer ecommerce object used as part of Enhanced Ecommerce. For ecommerce object you will need to implement the purchase measurement as described here. Normally ecommerce object collects more information about transaction, but on downside the numerical data such as price, tax, etc is passed as string. In my opinion data layer transaction is more than sufficient to all types of conversion pixels.
Data layer transaction object
All the transaction information should be passed via the data layer, as illustrated below. Please note data layer must be placed before GTM JavaScript snippet. As you can see following data layer includes basic details about transaction such as total, tax, etc. and a list of product details.
<script>
	    dataLayer = [{
	      'transactionId': '12345',
	      'transactionAffiliation': 'Acme Clothing',
	      'transactionTotal': 6100.00,
	      'transactionTax': 127.00,
	      'transactionShipping': 50.00,
	      'transactionProducts': [{
	        'sku': 'AA1243543',
	        'name': 'Fusce id molestie massa',
	        'category': 'Women',
	        'price': 2350.00,
	        'quantity': 1
	        },{
	        'sku': 'AA1243544',
	        'name': 'Luctus quam ultrices rutrum',
	        'category': 'Women',
	        'price': 1225.00,
	        'quantity': 2
	        },{
	        'sku': 'AA1243545',
	        'name': 'Wuam ultrices rutrum',
	        'category': 'Women',
	        'price': 1123.00,
	        'quantity': 1
	        }]
	    }];
</script>
GTM Support for Data Layer and Conversion
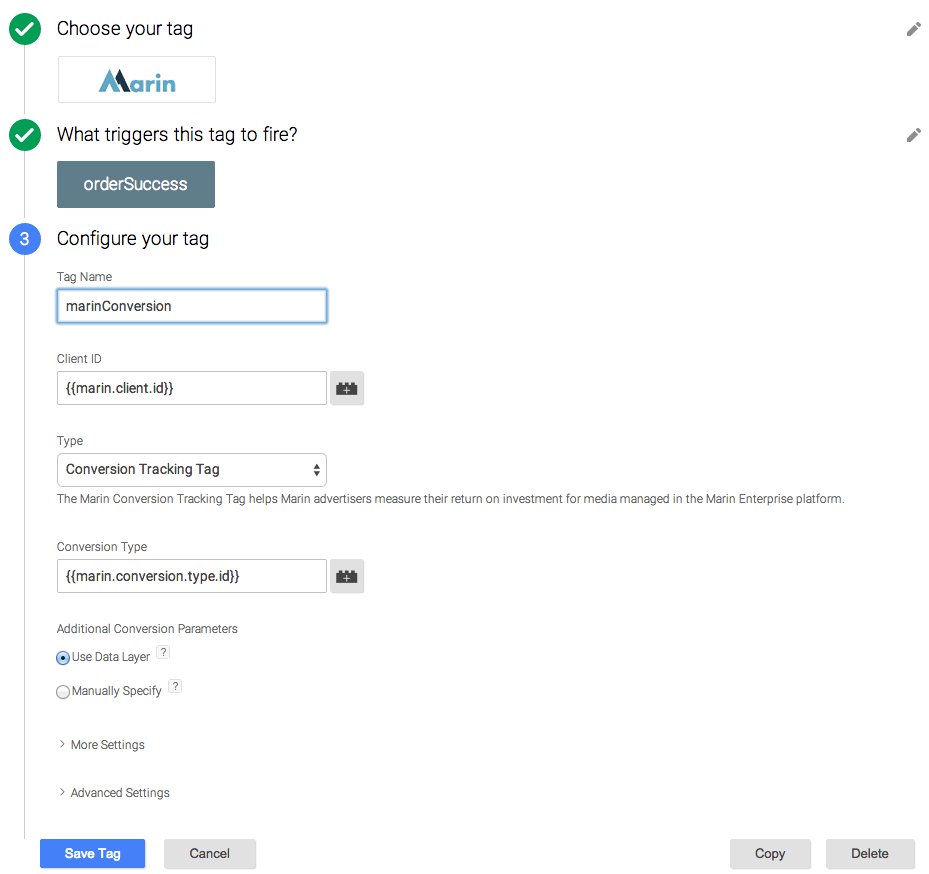
Many GTM tags (non-custom) can recognise transaction object in data layer and consume them as conversion parameters. For instance, Marin and Google Analytics tags can use data layer out-of-box. With Google Analytics you have to set the Track Type to "Transaction". For Marin you can select "Conversion Tracking Tag" in Type and in conversion parameter select "Use Data Layer" (see following image).
Custom HTML Conversion Tags
It is possible to reuse the data layer transaction object when using custom HTML conversion tags. This is basically a 2-step implementation process,
- Declare new variables (or macros in GTM v1) mapped to the key attributes of transaction object (One time)
- Use the declared variable/macros in the GTM tag to describe new conversion pixels (Repeat for each tag)
When using the GTM variables in the GTM tags, always wrap the macro name in double curly brackets.
Declare new variables
First declare new variables to capture details of the transaction or purchase. As you can see below we have declared a new GTM variable dl.transaction.id which maps to transactionId variable in data layer.
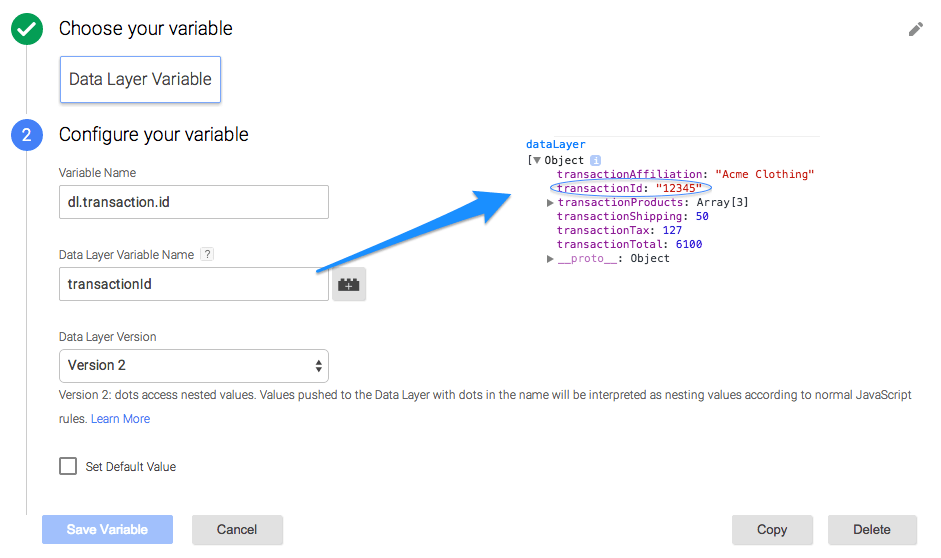
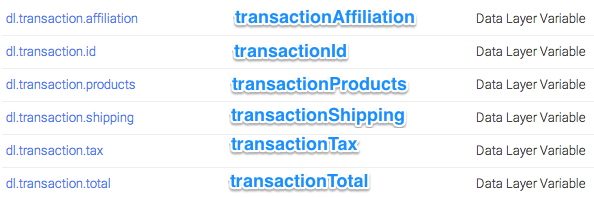
Similarly we can map all top-level data layer variables to GTM variables and then re-use them in GTM tags.
Using transaction variables in out-of-box GTM tags
As mentioned in previous section some GTM tags can recognise the data layer and consume transaction information from data layer. Few GTM tags such as DoubleClick Floodlight Sales (DFS) requires manual mapping of parameters to transaction variables. For DFS tag you can map "Revenue" and "Order ID" parameters to {{dl.transaction.total}} and {{dl.transaction.id}}.
Using transaction variables in Custom HTML tag
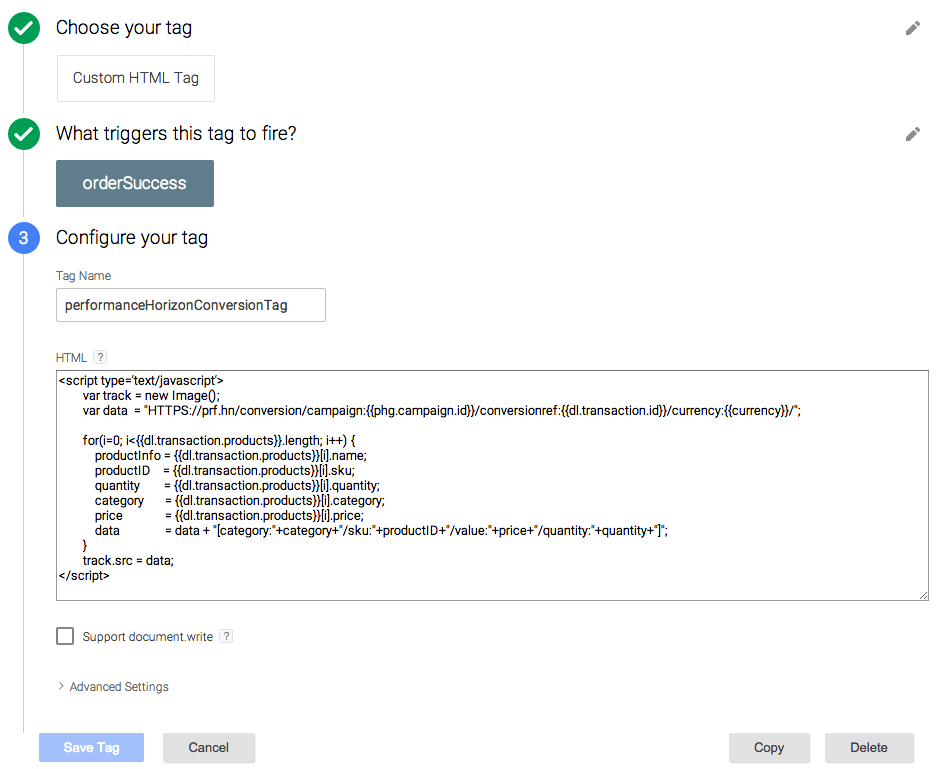
In this step we can use these conversion variables declared in previous step to create conversion related custom HTML tag. Let's take an example of Performance Horizon conversion pixel.
Pixel in img format,
<img src="https://prf.hn/conversion/campaign:99l99/conversionref:65536/currency:AUD/[category:accessories/sku:scarf64/value:50.00/quantity:1]" height="1" width="2" />
A JavaScript equivalent of above pixel,
<script type='text/javascript'>
	var track = new Image();
	var data  = "HTTPS://prf.hn/conversion/campaign:99l99/conversionref:65536/currency:AUD/[category:accessories/sku:scarf64/value:50.00/quantity:1]";
	track.src = data;
</script>
Now using GTM Custom HTML tag we can create an generic conversion pixel which utilises the GTM variables declared in first step. As you can see below - a very simple JavaScript snippet - we are iterating through the length of dl.transaction.products and for each product we are appending product details in prescribed format to data string.
<script type='text/javascript'>
	var track = new Image();
	var data  = "HTTPS://prf.hn/conversion/campaign:{{phg.campaign.id}}/conversionref:{{dl.transaction.id}}/currency:{{currency}}/";

	for(i=0; i<{{dl.transaction.products}}.length; i++) {
	    productInfo = {{dl.transaction.products}}[i].name;
	    productID    = {{dl.transaction.products}}[i].sku;
	    quantity        = {{dl.transaction.products}}[i].quantity;
	    category       = {{dl.transaction.products}}[i].category;
	    price              = {{dl.transaction.products}}[i].price;
	    data               = data + "[category:"+category+"/sku:"+productID+"/value:"+price+"/quantity:"+quantity+"]";
	}
	track.src = data;
</script>
Lets take another conversion pixel - Responsys Email.
img version of pixel
<img src="HTTPS://rsp.ServerName.net/pub/cct?_ri_=X0Gzc2X%3DS%3AzbHS%3ASRCR%3Aq&_ei_&OrderID=123&OrderTotal=120.99&action=once" WIDTH="1" HEIGHT="1">
JavaScript version of pixel,
<script type='text/javascript'>
	var track = new Image();
	var data  = "HTTPS://rsp.ServerName.net/pub/cct?_ri_=X0Gzc2X%3DS%3AzbHS%3ASRCR%3Aq&_ei_&OrderID=123&OrderTotal=120.99&action=once";
	track.src = data;
</script>
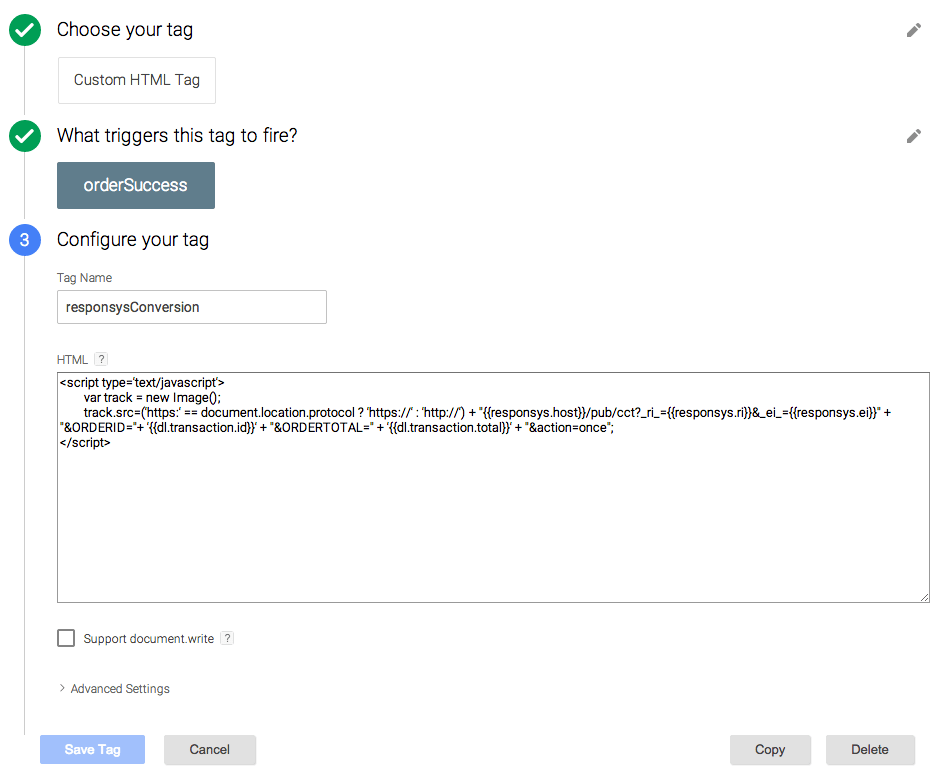
Now using GTM variables declared in first step we can create a custom HTML conversion tag for Responsys.
<script type='text/javascript'>
	var track = new Image();
	track.src=('https:' == document.location.protocol ? 'https://' : 'http://') + "{{responsys.host}}/pub/cct?_ri_={{responsys.ri}}&_ei_={{responsys.ei}}" + "&ORDERID="+ '{{dl.transaction.id}}' + "&ORDERTOTAL=" + '{{dl.transaction.total}}' + "&action=once";
</script>
Conclusion
In this post, we demonstrated that using data layer transaction object you can add new conversion pixels with minimal effort without involving your development or IT team. This approach is highly maintainable and extensible. You can add any conversion pixel as long as data required for conversion event is captured in data layer transaction object. Please note that approach highlighted here is not specific to GTM, you can implement this strategy with tag manager of your choice as long as transaction information is available in data layer.