Google Tag Manager: How it works
- Abhishek Tiwari
- Digital
- 10.59350/52a7p-5m153
- Crossref
- October 3, 2014
Table of Contents
In simple words, a Google Tag Manager (GTM) container holds other tags. GTM container is also know as universal container tag or site-wide tag. A GTM container is managed via GTM dashboard and controls tag dependencies and tag firing order. On your web page, you can have multiple GTM containers. GTM container code looks like following - embedded either header or footer of your web page template.
<!-- Google Tag Manager -->
<noscript><iframe src="//www.googletagmanager.com/ns.html?id=GTM-TWN9QS"
height="0" width="0" style="display:none;visibility:hidden"></iframe></noscript>
<script>(function(w,d,s,l,i){w[l]=w[l]||[];w[l].push({'gtm.start':
new Date().getTime(),event:'gtm.js'});var f=d.getElementsByTagName(s)[0],
j=d.createElement(s),dl=l!='dataLayer'?'&l='+l:'';j.async=true;j.src=
'//www.googletagmanager.com/gtm.js?id='+i+dl;f.parentNode.insertBefore(j,f);
})(window,document,'script','dataLayer','GTM-TWN9QS');</script>
<!-- End Google Tag Manager -->
Please note Google recommends to place GMT container code immediately after the opening <body> tag. This is mainly to avoid trouble with older versions of IE (IE7/IE6). Practically you can place GTM container code directly inside <head> or <body> element - but not wrapped in any other elements (e.g. inside <div>) - and it will work in all modern browsers.
All GTM containers are versioned (incremental ids). A GTM container can be published or unpublished. Only published version of GTM container is loaded in user’s browser. GTM also provides preview and debug mode which helps you to validate if tags are firing correctly. In addition, a GTM containers itself loads asynchronously without blocking the page. That said tags contained in GTM container may or may not be asynchronous.
How Google Tag Manager works?
Following illustration gives a high-level overview of how Google Tag Manager works.
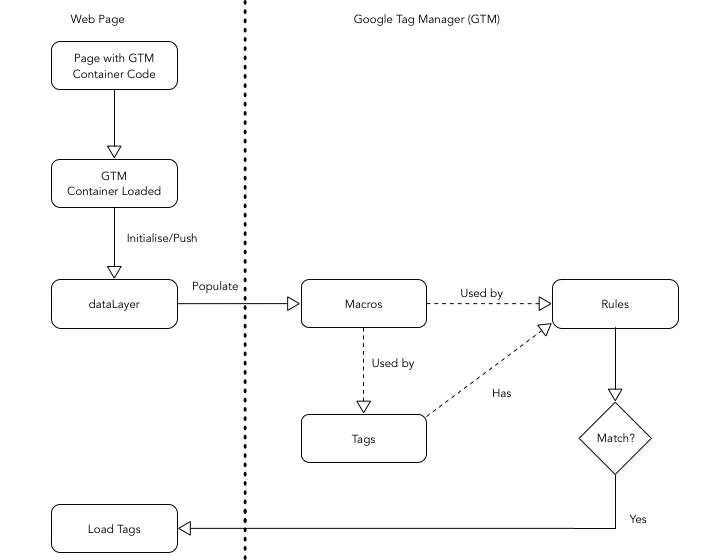
GTM Container Components
Each GTM container has three key components:
- Tags
- Rules
- Macros
These components are quite similar to traditional Model-View-Controller(MVC) pattern.
- Tags are like MVC view templates which are loaded on the page when associated tag rules are matched. Built-in template tags are available for Google services and dozen of other vendors. If you need to implement a custom tag template you can use GTM Custom HTML or Custom Image tags.
- Rules are like MVC controllers decide which tag to fire based on firing and blocking rules. A rule is a condition that evaluates to either true or false at runtime. To evaluate a rule, GTM compares page value of macro against value specified in the rule definition.
- Macros are like MVC model variables used in tag templates and rules. There are several built-in macros available by default to be used with tags and rules, or you can alway declare and define custom macros.
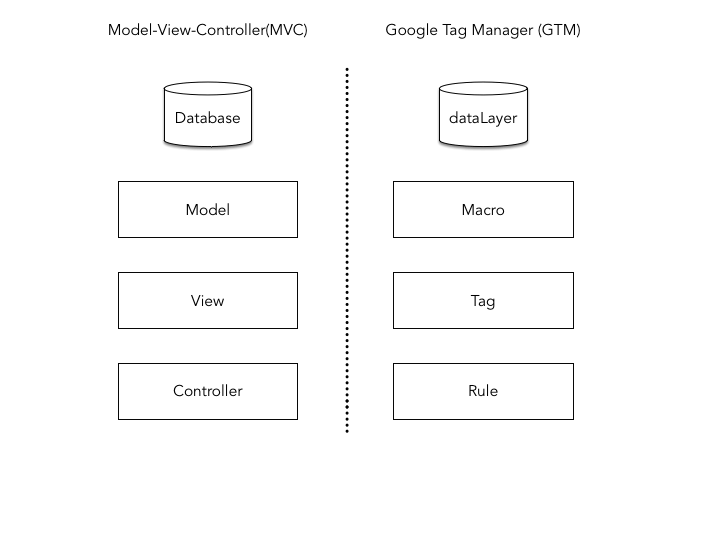
These components can not be shared across multiple containers. Each container has it’s own list of tags, rules and macros.
Data Layer
A data layer is an JavaScript object that contains all of the data that you want to pass to Google Tag Manager from your web page. This data can be about the page itself, events on the page or about user interacting with the page.
GTM has it’s own dataLayer object which can be initialised explicitly by placing dataLayer object just before the GTM container code or implicitly initialised when a GTM container is loaded on the page and nodataLayer object was found before GTM container code. GTM dataLayerobject contains 3 key events gtm.js, gtm.dom and gtm.load. These events fire in following order gtm.js > gtm.dom > gtm.load and represent GTM container script load on the page, page DOM ready and page DOM load events.
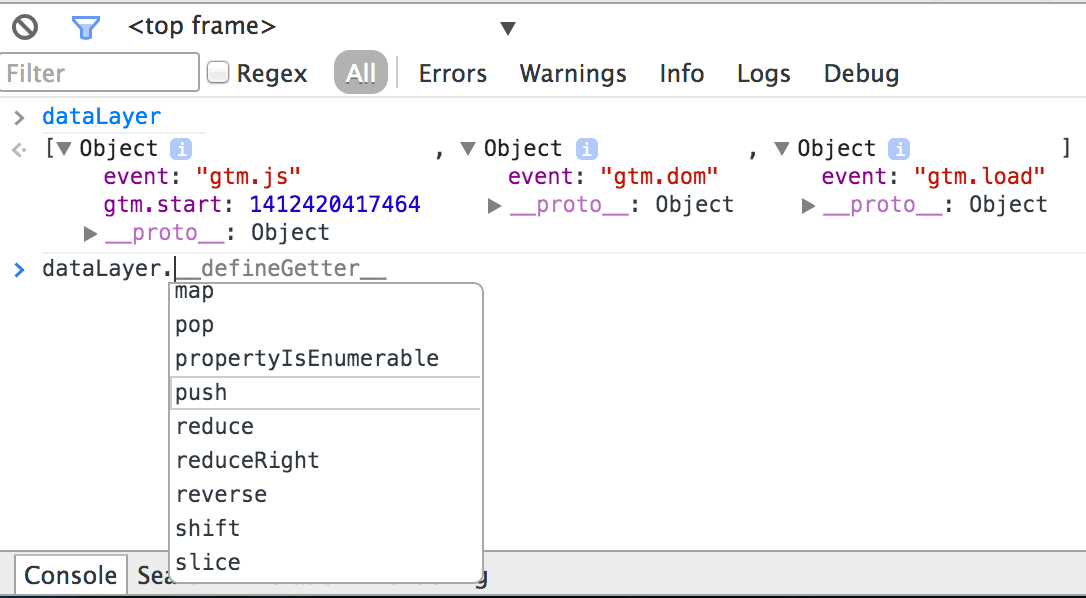
There are two ways you can pass data from your web page to GTM,
Explicitly initialising the dataLayer on the page
You must place the dataLayer object before GTM container code.
<!-- Data Layer - Before GTM Container Code -->
<script>
  dataLayer = [{
    'key1': 'value1',
     'key2': 'value2'
  }];
</script>
<!-- Data Layer Ends -->
Pushing key-value pairs to already initialised dataLayer
This is preferred way when passing data for events or client-side page load (for example - a single page app build on AngularJS).
<script>
dataLayer.push({
  'key1': 'value1',
  'key2': 'value2'
});
</script>
A more appropriate and practical example will be dataLayer using onclick event,
<a href="#" onclick="
dataLayer.push({
    'event': 'myTrackEvent',
    'eventCategory': 'Videos',
    'eventAction': 'Play',
    'eventLabel': 'Gone With the Wind',
    'eventValue': '4.00'
});">Play</a>
Data Layer and Macros
Once this data is pushed to GTM, tags can access data using GTM macros. For that dataLayer key or variable must be assigned to a GTM macro.
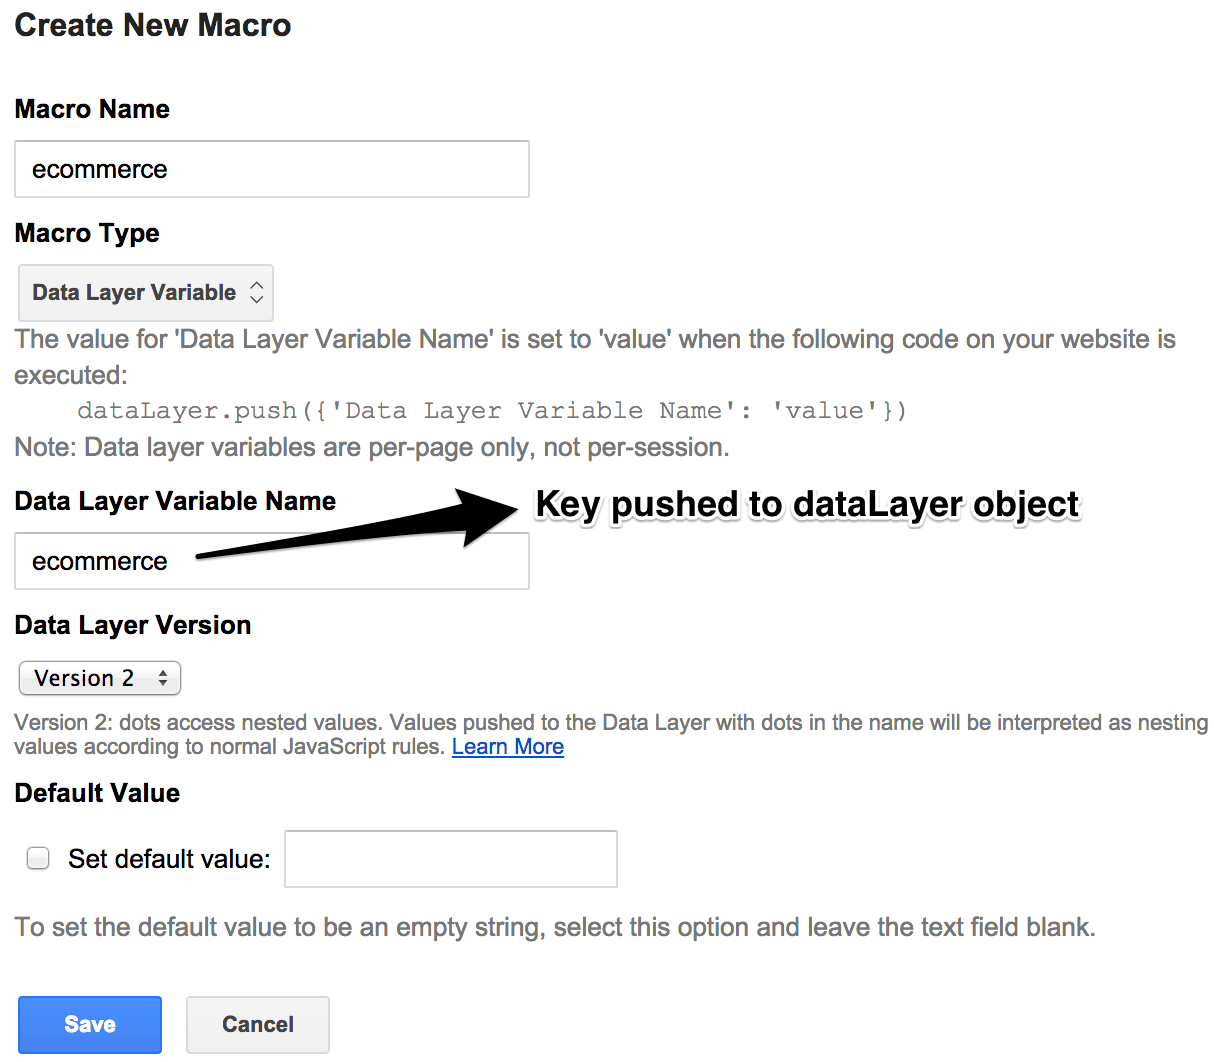
Things to consider
Sharing data layer across containers
If your page is holding multiple, GTM containers, then by default dataLayerobject is shared across containers. This is quite handy as you don’t need to pass same data multiple times. That said some time it make sense to isolate data layer for each container to avoid accidental mutation of data values. If needed you can use custom data layer object names for each GTM container, for example following GTM container code will use a custom data layer object name myDataLayer.
<!-- Google Tag Manager -->
<!-- Google Tag Manager -->
<noscript><iframe src="//www.googletagmanager.com/ns.html?id=GTM-TWN9QS"
height="0" width="0" style="display:none;visibility:hidden"></iframe></noscript>
<script>(function(w,d,s,l,i){w[l]=w[l]||[];w[l].push({'gtm.start':
new Date().getTime(),event:'gtm.js'});var f=d.getElementsByTagName(s)[0],
j=d.createElement(s),dl=l!='dataLayer'?'&l='+l:'';j.async=true;j.src=
'//www.googletagmanager.com/gtm.js?id='+i+dl;f.parentNode.insertBefore(j,f);
})(window,document,'script','myDataLayer','GTM-TWN9QS');</script>
<!-- End Google Tag Manager -->
Data layer conventions
As discussed here, when it comes to data layer there are too many conventions to follow. Even GTM’s very own dataLayer object offers two different ways to track ecommerce transaction - UA enhanced ecommerce purchase action vs GA ecommerce transaction variables. Customer Experience Digital Data Layer is a new emerging standard which is both vendor and tag independent. It is good idea to start with GTM dataLayer convention but I will highly recommend to adopt CEDDL as soon as possible in your implementation.
Configurable vs Editable Tags
Most of the GTM Tag templates are configurable - you can not edit template itself but you can configure values for given variables. So for instance, when you want to deploy an Universal Analytics tag then all you need is to specify the value for Tracking ID (see below).
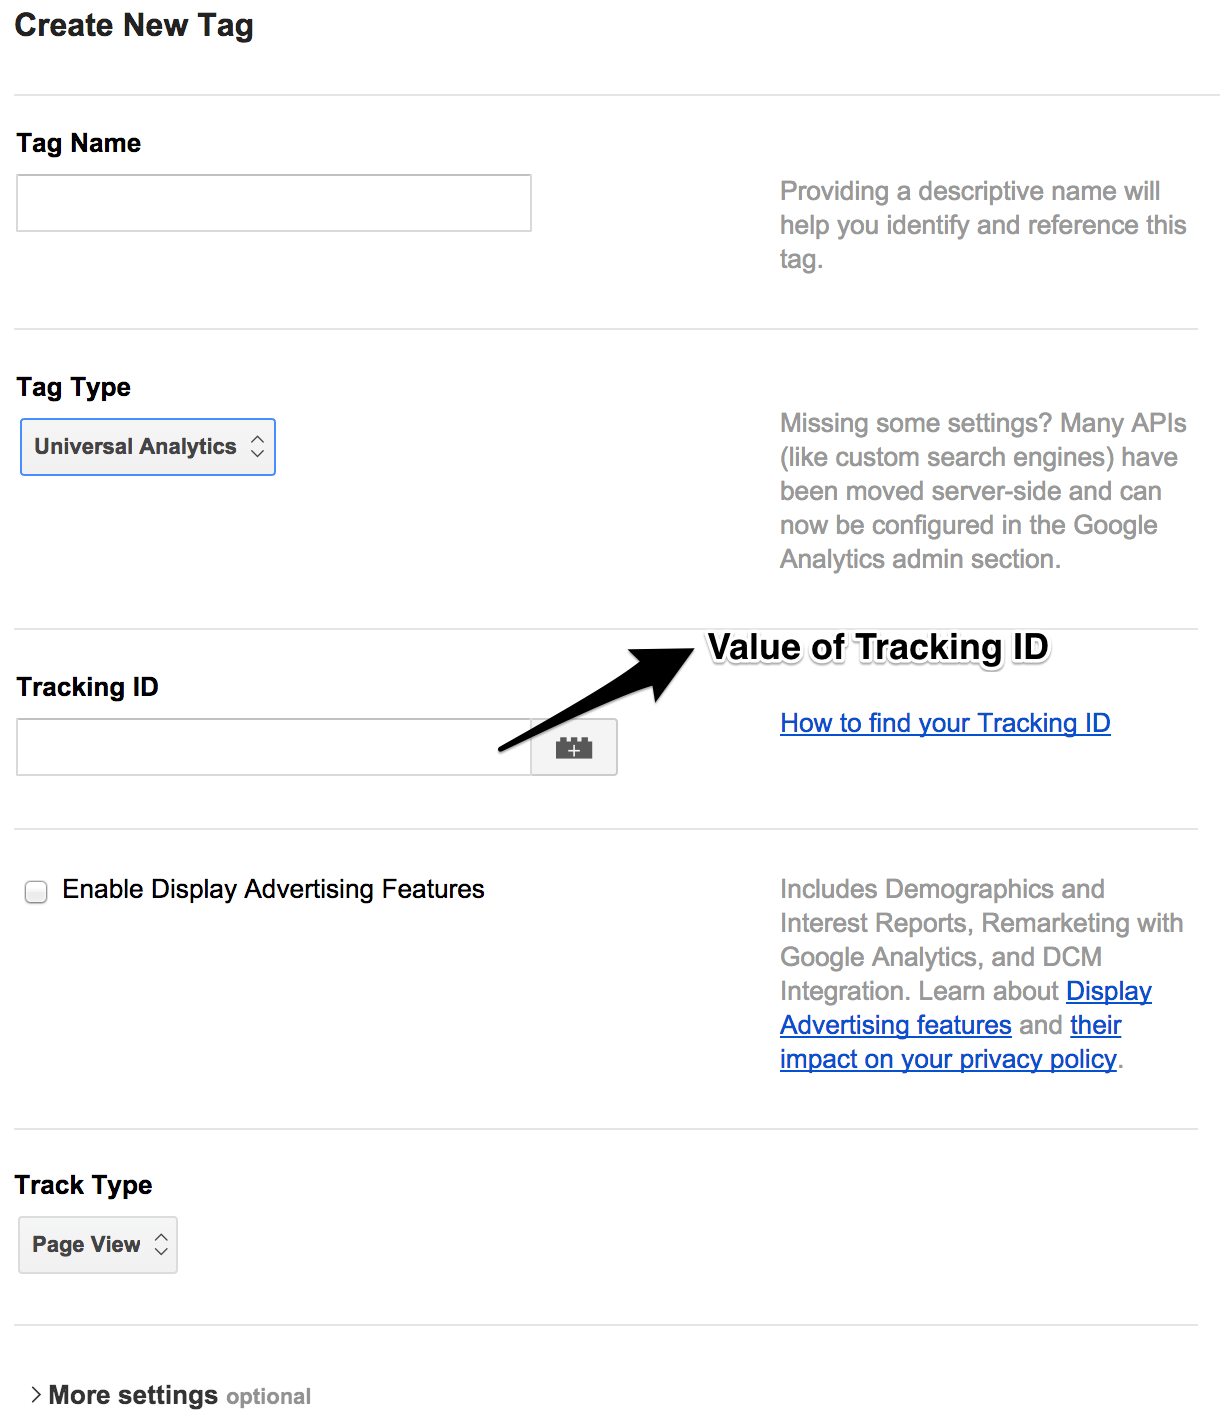
Behind the scene GTM will inject Tracking ID in a tag template like following,
<script>{{ noparse }}
  (function(i,s,o,g,r,a,m){i['GoogleAnalyticsObject']=r;i[r]=i[r]||function(){
  (i[r].q=i[r].q||[]).push(arguments)},i[r].l=1*new Date();a=s.createElement(o),
  m=s.getElementsByTagName(o)[0];a.async=1;a.src=g;m.parentNode.insertBefore(a,m)
  })(window,document,'script','//www.google-analytics.com/analytics.js','ga');

  ga('create', '{{ Tracking ID}}' , 'auto');
  ga('send', 'pageview');{{ /noparse }}
</script>
Custom HTML is only GTM tag which offers fully editable template. If you want editable tag templates you can always use Custom HTML tag. An example use case will be passing the User ID to Universal Analytics tag - as demonstrated below a custom Universal Analytics tag template is implemented using User ID and Tracking ID macros.
<script>{{ noparse }}
  (function(i,s,o,g,r,a,m){i['GoogleAnalyticsObject']=r;i[r]=i[r]||function(){
  (i[r].q=i[r].q||[]).push(arguments)},i[r].l=1*new Date();a=s.createElement(o),
  m=s.getElementsByTagName(o)[0];a.async=1;a.src=g;m.parentNode.insertBefore(a,m)
  })(window,document,'script','//www.google-analytics.com/analytics.js','ga');

  if ({{ User ID }} != "") {
    ga('create','{{ Tracking ID}}', { 'userId': '{{ User ID }}' });
  } else {
    ga('create', '{{ Tracking ID}}', 'auto');
 }
 ga('send', 'pageview');{{ /noparse }}
</script>
Data enrichment
Data enrichment allows sharing of first party and third party data to tags. First party data is data owned and collected by your website like shopping cart or order information. GTM can collect first and third party data from your website data using dataLayer object. When it comes to customer or user data, you should always avoid passing any personally identifiable information and if necessary use non-identifiable UUIDs, GUIDs, session IDs, cookies, etc.
Let say you want to load a particular display tag only for audience with interest in Formula1. Assuming audience segmentation information is provided by your data management platform (DMP) or Audience Management Platform (AMP) tag which will push a dataLayer variable audienceSegment. This extra bit of information provided by your DMP/AMP is enriching data layer. Using a GTM rule such as {{ noparse }}{{ audienceSegment }}{{ /noparse }} equals Formula1 you can selectively load your display tag for right audience.


