Kubernetes on AWS: What you need to know and why
- Abhishek Tiwari
- Technology
- 10.59350/7f459-80h39
- Crossref
- February 6, 2017
Table of Contents
Setting and running Kubernetes on Amazon Web Services (AWS) is a very involved process. AWS has decided to not implement Kubernetes as a Service but built something of its own - Amazon EC2 Container Service (ECS). Hence, you need to know and consider a lot of things before you can successfully roll out Kubernetes on AWS. These are the consideration which can make or break it your Kubernetes rollout.
Why Kubernetes
Often people ask me why Kubernetes on AWS and why not just use the ECS. Well here is a list of reason why you should use Kubernetes on AWS and not ECS.
Open source, no vendor lock-in
Kubernetese is an open-source project supported by a large number of public cloud providers including Google, Microsoft, and IBM. So there is no fear of vendor lock-in. In fact, you can run your workloads across multiple cloud providers all the time. You can also migrate your applications running on Kubernetes from one vendor to another without any disruptions.
Portable, general purpose
Kubernetes runs everywhere in public cloud, private cloud, bare metal, laptop, etc. It offers consistent behavior so that applications are portable. I am yet to see a local development version for ECS. In addition, Kubernetes is general purpose and it can run a variety of workloads including stateless and stateful, microservices and monoliths, services and batch, greenfield and legacy.
Extensible, state of the art
Kubernetes is highly extensible and allows you to integrate it into your environment. You can choose different container run times (Docker vs. rkt). Based on requirements, you can choose from a range of networking models including Flannel, Project Calico, Open Virtual Networking, Weave Net, etc. Kubernetese’s IP per Pod networking model is nothing less than genius.
Cloudbursting, sensitive workloads
With Kubernetese you can run workloads in your on-premise clusters, but automatically “overflow” to your cloud-hosted clusters whenever additional capacity is required. Moreover, you can run your normal workloads in your preferred cloud-hosted clusters, but divert your sensitive workloads to run in secure, on-premise clusters.
As some people have already noted, ECS is a burden and drag for AWS. The value of ECS for enterprises viewing containers as a hybrid cloud deployment architecture is less clear especially when compared to Kubernetese and open source PaaS systems are Red Hat’s OpenShift and Pivotal’s Cloud Foundry. I could not agree more.
Cluster Architecture
A Kubernetes cluster contains a range of Kubernetes nodes (AKA workers or minions) and a cluster control plane (AKA master). Kubertnetes nodes in a cluster are the machines (physical servers or cloud servers) and they run your application as pods.

Control Plane
Kubernetese control plane has following key components - API server, Distributed watchable storage, Scheduler, Controller manager Server. These components can be co-located or spread across machines as dictated by cluster size or high-availability requirements of the cluster. Cluster state is backed by a distributed watchable storage system (etcd). At a minimum to keep control plan stateless, etcd should be running on dedicated servers. This will allow other components to auto-scale using an EC2 auto scaling group.
Nodes
A Kubernetes node requires following services in order to run Pods and be managed by Kubernetes control plane: Kubelet, Container runtime, Kube Proxy. A Pod encapsulates one or more application containers, optional storage volume, a unique network IP, and options that dictate how the containers should run. A Kubernetes node can be a Linux node or Windows Server node. This means Kubernetes control plane continue to run on Linux, while the Kubelet and Kube-proxy can be run on Windows Server. This is a perfect situation for the organizations with mix workload across Linux and Windows Server.
Kubelet
The kubelet is an agent that runs on each Kubernetes node. The cluster control plane interacts with Pods using Kubelet. Kubelet implements Pod and Node APIs that drive the container execution layer.
Container runtime
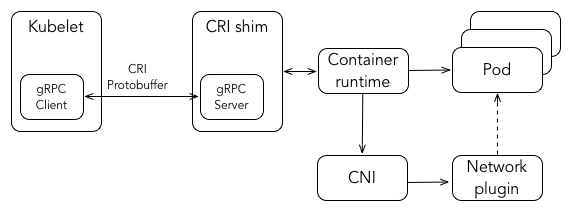
Each node runs a container runtime, which is responsible for downloading images and running containers. The latest version of Kubernetese supports Docker and rkt as container runtime. Kubelet communicates with Container Runtime Interface (CRI) - a plugin interface which enables kubelet to use a wide variety of container runtimes, without the need to recompile. In addition, starting from Kubernetes version 1.5 support for Windows Server containers is available. For Windows, Kubernetes can orchestrate Windows Server Containers and Hyper-V Containers.

Kube Proxy
Each node runs a Kube proxy process and can do simple TCP, UDP stream forwarding or round robin TCP, UDP forwarding across a set of backends (pods).
High availability
You have to consider high-availability not just for nodes but also control plane. Kubernetes provides two different strategies for high availability:
- Run a single cluster in multiple cloud zones, with redundant components such as master,
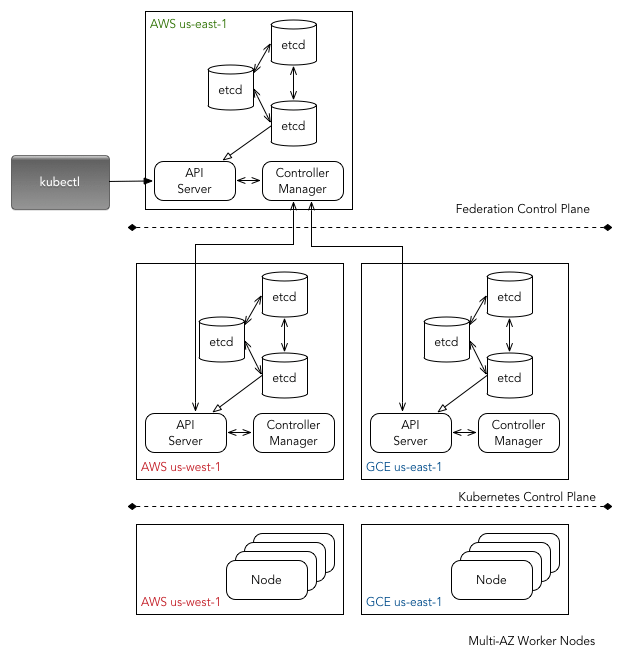
etcd, worker (ideal for multi-AZ high-availability) - Run multiple independent clusters and combine them behind one management plane: federation (ideal for multi-region or multi-cloud high-availability)
Cluster Federation
For most workloads single cluster spanning across multiple cloud zones in one cloud region would be sufficient. That said, it is worth considering either a multi-region or multi-cloud deployment using cluster federation. You can also federate multiple single cloud zone cluster in a given cloud region. Kubernetese recommends this approach and it works seamlessly if you have a multi-region or multi-cloud strategy in place.

Cluster Setup
Once you have a good understanding of cluster architecture based on your requirements, you can move on to the cluster provisioning and configuration part. Here you have two options: 1) bootstrap the Kubernetes cluster from scratch or the hard way, or 2) use Kubernetes cluster provisioning tool such as kops or kube-aws.
Bootstrapping the Kubernetes cluster is helpful if you trying to learn in and outs of the Kubernetes platform and you are interested in understanding how everything fits together. Otherwise, tools like kops (also known as Kubernetes Operations) or kube-aws are more than sufficient to setup the production grade Kubernetes cluster. There is another tool Kubernetes on AWS which seems promising as it overcomes some of the drawbacks of the kube-aws but still not ready for production deployments.
When selecting between kops and kube-aws, it is important to consider following factors,
- component based high-availability for the Kubernetes cluster (spread master, worker and
etcdacross multiple availability zone) - support for the cluster federation and federation based high-availability setup using multiple Kubernetes clusters
- separation or collocation of master and
etcd(ideally we want to runetcdseparately from master, so that master is stateless) - ability to auto-scale the worker (aka minion) nodes as well as master nodes (stateless) depending utilization and resource availability
- ability to customize infrastructure - VPC, subnets, private/public subnets, instance type, tagging, the number of workers, spot instances, etc.
- support for different networking and DNS options and their integration with AWS networking options and Route 53.
- ability to store the state of cluster and the representation of cluster
- option to upgrade a cluster, manage cluster add-ons, reconfigure the components and instances
- streamlined workflow for backing up
etcdand restoring theetcdfrom backup
Based on all of above factors, kops will be a more logical choice.
Networking
Kubernetes networking model supports one IP per pod. Pods in the cluster can be addressed by their IP. All containers within a pod behave as if they are on the same host with regard to networking.
CNI
Kubernetes uses Container Networking Interface (CNI) plug-ins to orchestrate networking. Every time a POD is initialized or removed, container runtime invokes the CNI plugin.
DNS
DNS is a built-in service launched automatically by the addon manager using kube-dns cluster add-on. Basically, kube-dns schedules DNS Pods and Service on the cluster, other pods in the cluster can use the DNS Service’s IP to resolve DNS names. If you are in AWS it makes more sense to use Amazon Route 53 as external DNS. This can be achieved by synchronizing Kubernetes Services with Amazon Route 53 as describe here and here.
Certificates
Kube-Lego brings fully automated TLS management to a Kubernetes cluster. It automatically requests certificates for Kubernetes Ingress resources from Let’s Encrypt - on AWS only Nginx Ingress Controller is supported. Another option is to use Kubernetes Certificate Manager which can manage Let’s Encrypt certificates for a Kubernetes cluster.
IAM Permissions
At this stage, Kubernetese is not native the AWS IAM roles and permissions. Hence you need to give a special consideration to how you want to provide IAM permissions to your nodes, pods, and containers. Obviously, you can assign a global IAM role to a Kubernetes node which is the union of all IAM roles required by all containers and pods running in the Kubernetes cluster. From a security standpoint, this is not an acceptable solution because a global IAM role can be inherited by all pods and containers running in the cluster. Hence, you will require a more granular approach which enables assignment of IAM roles at pod and container level and not node level.
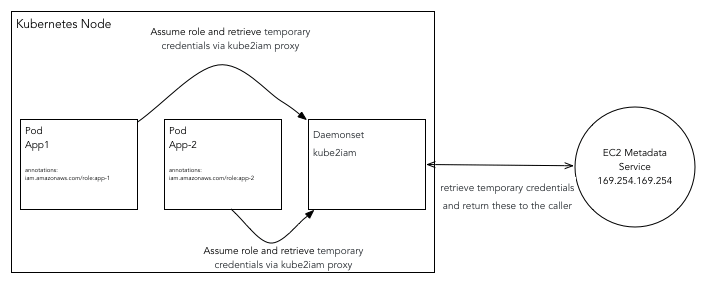
Luckily, Kube2iam offers a clean solution for this problem. It provides credentials to containers running inside a Kubernetes cluster based on role annotations. You will need to run Kube2iam container as a daemonset so that it runs on each Kubernetes node. All requests to EC2 metadata API from containers are proxied via Kube2iam container. It is important to note that Kube2iam will use the in-cluster method to connect to the Kubernetes master and retrieve the role for the container using the iam.amazonaws.com/role annotation. Finally, Kube2iam container makes a call to the EC2 metadata API by assuming container role to retrieve temporary credentials behalf of the container and returns credentials to the caller.

Please ensure that your developers are not hard coding IAM access tokens into application. This is anti-pattern and should be avoided at any cost. Only IAM roles should be pushed to the code repository.
Developer Workflow
A typical end-to-end developer workflow normally involves 1) a local development environment, 2) one or more container repositories, 3) a continuous integration tool, 4) a continuous delivery tool.
Local Development Environment
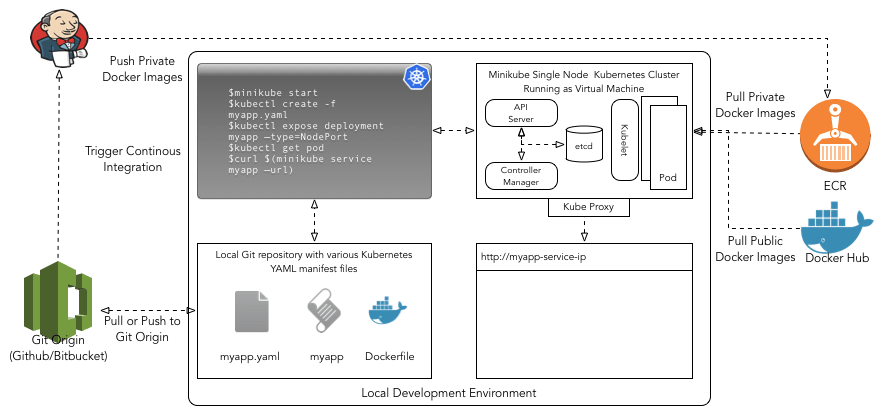
Following image illustrates the local development environment for Kubernetes. This setup is not specific to AWS and can be used with any cloud provider. You basically require Minikube, Kubectl, and Docker toolkit installed on your laptop or development machine along with a version control system such as Git.

Minikube
For developing applications against Kubernetes one should ideally use minikube. Minikube is used in conjunction of Kubectl (see details in next section). Minikube enables you to run Kubernetese without much hassle. Basically, Minikube runs a single-node Kubernetes cluster inside a VM on your laptop on top of Virtualbox or VMWare Fusion driver. Minikube provides access to most of the Kubernetese components optimized for local development. As you are intending to deploy your application in AWS based Kubernetese cluster, IAM roles will not work with Minikube hence you should use AWS access keys for local development and testing.
Moreover, Minikube also provides several built-in add-ons that can be used enabled, disabled, and opened inside of the local Kubernetese environment. Some of the add-ons are quintessential and enabled by default (i.e. dashboard), others you have to enable such as registry-creds, kube-dns, ingress, etc. Add0-on registry-creds allows you to pull to private docker images stored in Amazon’s EC2 Container Registry (ECR) to your local Kubernetes cluster. Similarly, ingress add-on gives you the ability to provision Nginx ingress controller locally. In addition, you can always pull public images from Docker Hub without authentication.
Please ensure that your developers are not pushing Docker images built locally to ECR. This is anti-pattern and should be avoided at any cost. Images required for UAT and Production should be created by a continuous integration system and pushed to ECR.
Kubectl
Kubectl is a command line interface for Kubernetes which enable developers and system administrators to run commands against Kubernetes clusters (local cluster as well as the remote cluster). Kubectl interacts with your cluster via API Server endpoints. Before you start issuing the commands to your cluster, you will need to authenticate against to your cluster’s identity provider. API server supports several authentication strategies including client certificates, bearer tokens, an authenticating proxy, or HTTP basic auth. Using Kubectl you can run configuration commands for set-cluster, set-credentials, set-context. Once you are configured, you can switch between multiple clusters by running use-context.
kubectl config set-cluster default-cluster --server=https://${MASTER_HOST} --certificate-authority=${CA_CERT}
kubectl config set-credentials default-admin --certificate-authority=${CA_CERT} --client-key=${ADMIN_KEY} --client-certificate=${ADMIN_CERT}
kubectl config set-context default-system --cluster=default-cluster --user=default-admin
kubectl config use-context default-system
Container repository
You will certainly need a Docker container registry to store, manage, and deploy your private Docker container images to Kubernetes. As we are deploying our Kubernetes cluster on AWS, it makes sense to use ECR. In ECR, you should create a separate ECR repository for each Docker image. In Pod or deployment definition files, we can specify an ECR image using ACCOUNT.dkr.ecr.REGION.amazonaws.com/myimagename:tag. Normally you want to use latest tag when pushing or pulling images to or from your ECR repository.
As discussed above, for Minikube you should use registry-creds add-on which allows you to pull to private docker images stored in ECR to your local Kubernetes cluster.
Kubernetes has native support for ECR, when nodes are AWS EC2 instances. In deployment mode, ECR images are fetched by kubelet and it periodically refreshed using ECR credentials. This means kubelet will require appropriate permissions to periodically refresh the ECR credentials.
Continuous integration
Assuming you have created an ECR Repository in your AWS account, Docker runtime along with appropriate Jenkins plugins (Pipeline plugin, Docker Pipeline plugin, Amazon ECR plugin) is installed on Jenkins server, I suggest using Jenkins Pipeline to build Docker images and push them to your ECR (see example Groovy code below).
node {
  stage 'Checkout'
  git 'ssh://git@github.com:mygithubid/myapp.git'

  stage 'Docker build'
  docker.build('myapp')

  stage 'Docker push'
  docker.withRegistry('https://ACCOUNT.dkr.ecr.REGION.amazonaws.com', 'ecr:REGION:my-ecr-credentials') {
    docker.image('myapp').push('latest')
  }
}


